


Waiting for the loading and firing


Colour Blends

Pouring

Final Glaze Firing
The class used several strategies for the final surface treatments of their projects. Some used the bright colours of underglazes along with a clear glaze. Others opted for the glazes available at the guild. Finally, some used commercial glazes. It really depended on their sensibilities and trying to materialize what is seen and felt by the maker.
Bisqued Plates and pots using transfer printing

Strategies for coil building
 Week 6: Glaze Firing
Discussion: Firing (electric, wood, atmospheric) and its effects. A PDF will be sent out on this.
Coil sculpture continued.
Everything but the coil project should be dry enough for firing.
In preparation for a glaze firing, you will be glazing some works in class. I have already bisqued many of your pieces so don't panic.
* We will be mainly using the clear glaze. This will be applied over your bisqued pieces by the pouring method.
* Other colours in the guild's glaze collection may also be used.
* Whatever is not finished for a glaze tonight, arrangements will have to be made with me for an extra session.
* Some of you were asking about membership last week and this is the person to contact: Donna Schenher - donna.schenher@gmail.com or check the website OldmanRiverPottersGuild@gmail.com
* There will likely be another Handbuilding class starting around mid-February, so you may continue some work at this time. Let me know so that your name can go on a list for first announcements.
Week 5: Simple Glazing and Sealing
Discussion:
A pdf has been sent out entitled "Glaze Info". We will be going through glaze theory that Thursday, Nov.3, 2022.
- key parts of a glaze
- decontructing glossy and matte; proportional relationships of silica to alumina
- colour additives: traditional oxides and Mason Stains
- what are encapsulated pigments
- a brief historical background to sealing clay (watertight to dishwasher safe).
Continue working on projects.
Project: Transfer printed Plates - trim and add lip/feet - finish to dry.
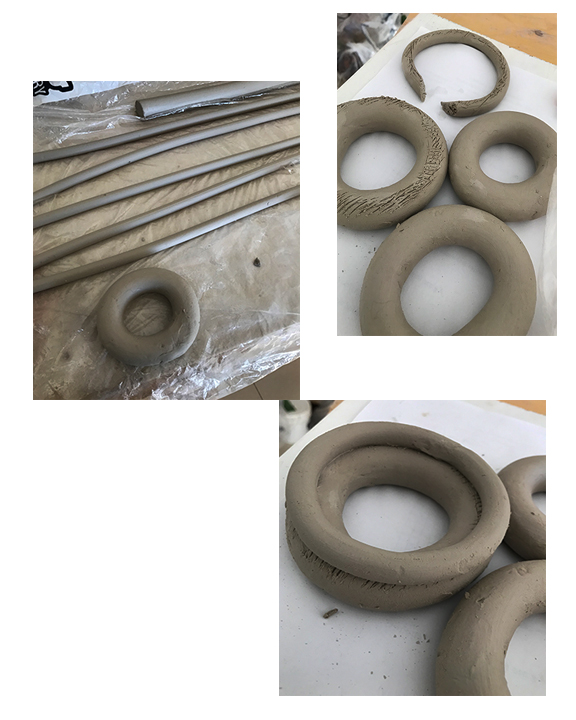
New work: Start a coil sculpture/vessel on three legs (Candlabra or Tree of Life) - start by extruding coils and make a 3 part base lke a clover leaf.

Week 4: Transfer Printing onto a roundish/squarish plate (we are using Hump molds)![]()
![]()
Above: Transfer Painting on Newsprint
Discussion: Draw out a simple design in the shape of your plate
Preparing the transfer: Using newsprint we will paint our design, cover it with slip and transfer this to the plate.
Technical: We will make coils on the extruder. These are added for a finer edge on plates. We will also use a coil to form a a foot on project 3 if its not too dry.
Drying: Tight wrap to looser wrap in week 2/3 - works from week 1 & 2 should be dry enough for firing (bisque fire).
White Slip for Transfer Process
Slips are very versatile and can be fired at almost any temperature. I am posting a few here that are very versatile:
|
All Purpose White Slip (Jason
B Burnett, Pottery Mking, 2022 Sept/Oct.)
Cone 04-10 |
Base Slip (Sunshine Cobb,
Handbldg.)Cone 04-9 |
White Base Slip |
Week 3: Decorated Container - Moving Towards Complex Forms
 |
|

Discussion: Using Darts to Alter the Form
A simple template design is given curves and movement through darting.Thinking of Surface Decoration from the start by impressing the surface with stamps, rollers, textyre plates. Adding textured cutout shapes over the base plane.
Technical: Demo on the slab roller usage.
Drying: Tight wrap to looser wrap in week 2/3.


Project: Tulippiere - Five Part Form
The template as a deconstruction of various circles.
Our tulippiere: base, mug body (shortened a bit), shoulder, lip
Thinking of Surface Decoration from the start: texturing of some parts before cutting of template, addition of spheres, slip dots and underglaze. Subtracting circles (using circular cutters) or geometric shapes.
Drying: Tight wrap to looser wrap in week 2/3
Week 1: Introduction
Week 1: Making a Mug
Discussion: The Template
Where can we source a mug template and what is it based on?
Making Handles
Preparing the Clay - pounding, rolling, compressing & smoothing the surface
Clay readiness: soft slab and hard slab
Preparing for bisque firing: finishing details, cleaning surface, applying 3 Underglaze colours
Drying: Tight wrap to looser wrap in week 2/3